I CT For


Check 'Em!


My Blinkies!

Peaches Blog Train!

My Avatars (DO NOT SNAG)


Sunday, January 5, 2014
Coloring De-saturated Tubes Easy Tutorial

You can go even further by going to Adjust -> Hue and Saturation -> Hue/Saturation/Lightness (or SHIFT + H for a keyboard shortcut) and adjust the settings to your liking. Here's what I used and the result I got (click the preview to view it full size):

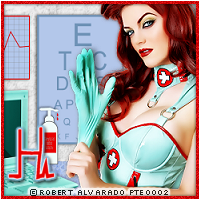
Now lets move onto the bow! Highlight the "Bow desaturate" layer in your palette. Go to Adjust -> Hue/Saturation -> Colorize (or SHIFT + L for keyboard shortcut). Now we are going to change the settings to get a wonderful blue color for her ribbon/bow on her dress. Settings shown below:

Now highlight the "Hair desaturate" layer in the palette. Go to Adjust -> Hue/Saturation -> Colorize (or SHIFT + L for keyboard shortcut). Now we are going to change the settings to get a brown color for her hair. Settings shown below:

I also changed the brightness/contrast settings found by going to Adjust -> Brightness and contrast -> Brightness/Contrast and using these settings (click preview for full size):

Now for the "Hair bow desaturate layer". Colorize that using these settings:

I didn't mess with the brightness/contrast/lightness on the hair bow. Now for the "Latex dress desaturate" layer in the palette. Highlight the layer and colorize it to these settings:

Again, I am satisfied with the coloring without messing with the brightness/contrast/lightness. Now for the "bas" layer. Highlight that in the layer palette. I'm going to make it white using Adjust -> Color -> Channel Mixer with these settings:

Here's my final result (click preview for full size):

This tutorial was written by Ruinations By Hayleigh on January 5, 2014. Any resemblance to another tutorial is purely coincidence. Do not claim this tutorial as your own!

Subscribe to:
Post Comments
(Atom)
About Me

- Hayleigh
- Oklahoma
- I'm a 30 year old SAHM to 3 adorable boys and newlywed to a wonderful husband. I've been using PSP for 9 years.
CU Licenses

Stamps

0 comments:
Post a Comment